What Is a Tech Pack? A Step-by-Step Guide to Making One (2026)
A tech pack is the blueprint for your garment — the single document that tells a manufacturer exactly what to make and how to make it. You'll see it written both ways, tech pack and techpack, and they mean the same thing.
Get it right and factories can quote accurately and produce your designs to spec. Get it wrong, or skip it, and you're gambling with your time and money.
Plenty of first-time designers see the word "technical" and panic. A clothing tech pack does involve technical bits — correct garment dimensions, some industry-specific language — but it's nothing scientific, and the jargon gets easy once it's explained.
In this guide I'll break down what a tech pack is, whether you need one, what a bad one actually costs, and how to make one step by step — including the measurement spec and construction notes most guides skip.
Don't want to build one from scratch?
My tech pack template gives you every page a manufacturer needs — bill of materials, points of measure, costing, and a worked example to follow. Ready to fill in.
What is a tech pack and do I need one?
Before we dive into how to create tech packs, let's start by defining what a tech pack is. Clothing tech packs, or technical specification packs as they're sometimes terrifyingly called, are basically the blueprints of your garments.
You wouldn't build a house without a blueprint that details the dimensions, floorplan and materials, and the same applies to developing clothing.
Without a detailed tech pack, manufacturers can't accurately quote for your clothing or correctly produce it. A tech pack acts as a collection blueprint for manufacturers, offering all the design details they need to create your garments in line with your specifications.
Manufacturers need to see every minute detail to be able to calculate production costs, MOQs (Minimum Order Quantities) and to estimate how long the entire product development process will take.
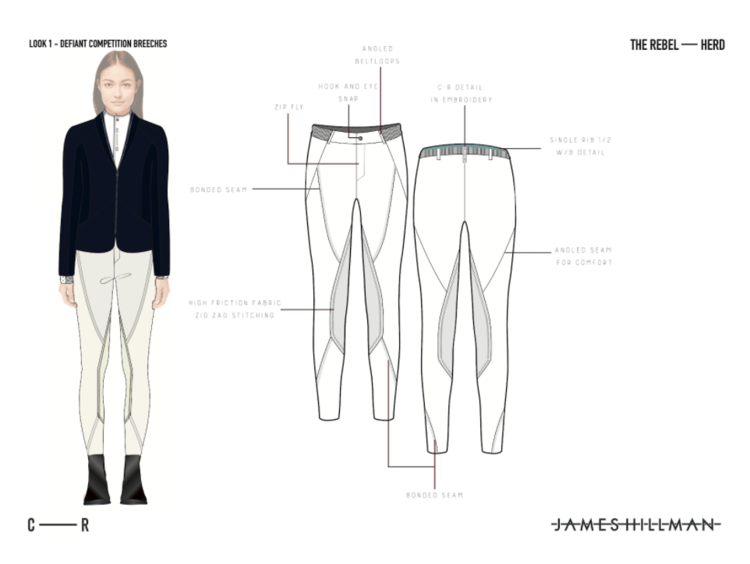
Do I need a tech pack?
I've broken this down into a question all by itself because the answer is always: yes.
Clothing tech packs are the most important asset you have when approaching manufacturers. From a manufacturing point of view, they help:
Assess the style being produced. The style determines how complex the manufacturing will be, the estimated timeframe, and the estimated cost.
Calculate how much fabric needs to be cut. Seam-to-seam measurements let manufacturers calculate fabric usage — vital for costing and accurate production.
Calculate the costs of materials. Every tech pack has a BOM (Bill of Materials), which lets manufacturers cost fabrics, buttons, zippers and trims.
Get the colour right. Colours in a tech pack follow the Pantone colour matching system, the leading authority on accurate colour matching.
Determine dyeing costs. If a manufacturer doesn't stock your colour, it needs to be dyed — a cost that has to be incorporated into production.
Determine printing techniques. Different prints suit different techniques; the pack tells the factory which applies.
Provide specifications for labels. Care labels, woven labels and hang tags all carry options and MOQs of their own, so the factory needs a spec.
Ensure quality control. With all measurements, materials and specifications documented, the factory can check finished garments against the pack during QC.
The economics of getting it right
A professionally built tech pack costs a few hundred pounds per style. A sample round costs a meaningful fraction of that in money and — more importantly — two to six weeks in time.
An incomplete pack routinely adds two or three unnecessary sample rounds. That's how a founder saves £300 on the document and spends £1,000 and a season fixing what it didn't say.
I've reviewed hundreds of tech packs over twenty years, and the ones that produce clean first samples share the same quality: nothing is left for the factory to interpret. When a pack is vague, the factory fills the gaps with its own defaults — and its defaults are never your defaults. Precision is cheaper than revision, every time.
Tech pack or techpack — is there a difference?
None at all. Some people write it as two words (tech pack), some squash it into one (techpack), and you'll even see "technical pack" or "spec pack". They all describe the same thing: the blueprint a manufacturer works from. Whichever spelling you land on, the contents are what matter — and that's what the rest of this guide covers.
What should be included in a tech pack?
Every pack looks a little different because every garment is individual, but a factory-ready tech pack follows the steps below.
1. An idea of the clothes you want to produce
The first and most important step. Just like this guide has an introduction, so should your tech pack — and tech pack introductions tend to be visual. They're usually sketches or reference photographs that give the manufacturer an idea of your end product.
In the introduction your manufacturer will also want to know whether you're looking to use sustainable materials, natural dyes, or specific market-level materials for the garments.
If you're including photographs:
Find images as close to your idea as possible.
Save them into your tech pack with a one-line annotation.
Compress the files — oversized images make the pack too heavy to email.
If you're including sketches:
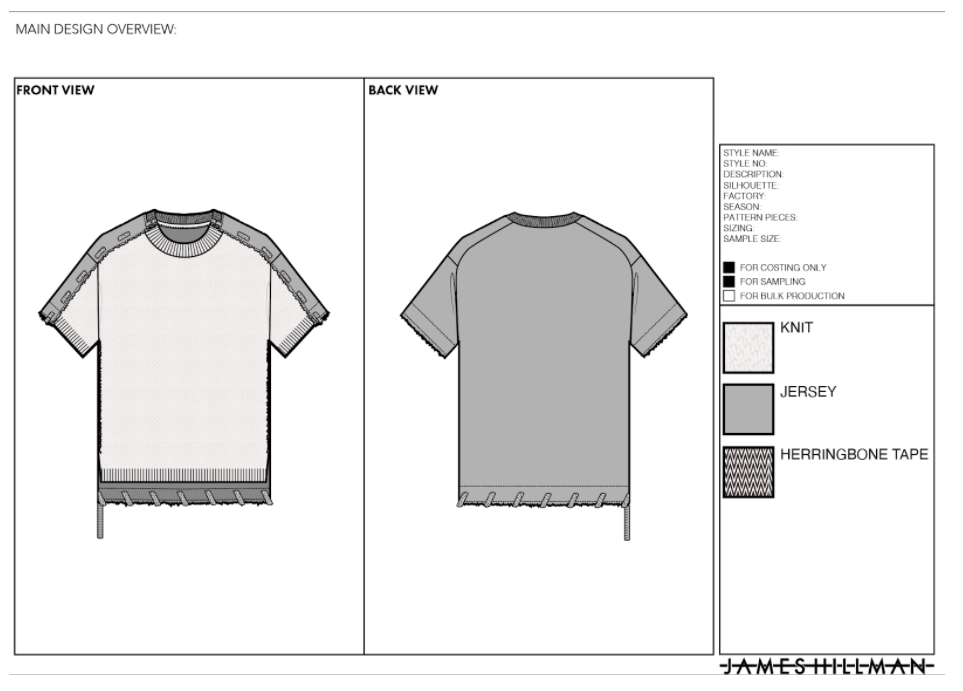
Keep them simple. An overload of information isn't necessary at this stage.
Use basic shapes with simple elements that represent the garment's features, placement and shapes.
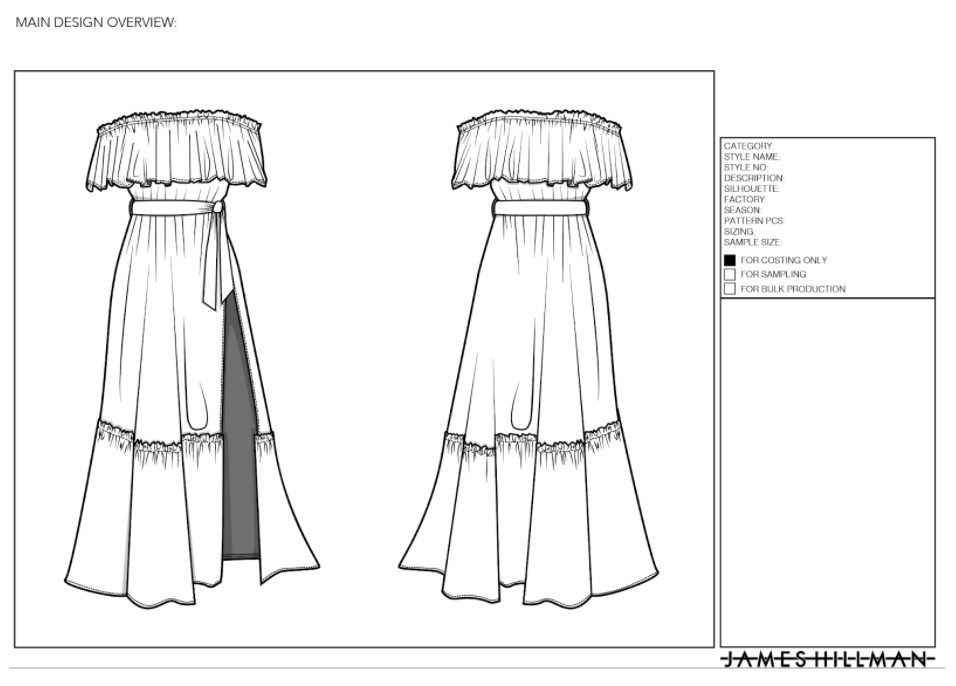
Show the clothing straight on — front and back.
Keep them more detailed than artistic. They're a blueprint, not a life drawing class.
I use Adobe Illustrator — it's the clearest way to develop technical drawings of clothing.
The introduction should be the front or cover page of your tech pack. And for anyone without extensive garment construction knowledge, FASHIONARY's FASHIONPEDIA is an excellent resource — I still use it from time to time.
2. Your MOQ
MOQ means Minimum Order Quantity, and every manufacturer — and every supplier that supplies them — has one.
Manufacturers need to know your quantities and target price to know whether your order is worth their while. A smaller factory might work from around 30 garments; the figure varies with the size of the operation. If your order sits below their MOQ, the time, cost and labour simply aren't profitable for them.
MOQs also matter because the factory needs to know how your order spreads across sizes — that determines how much fabric and material to buy, and if dyeing is involved, how much dye to mix.
Include your quantities and size breakdown clearly (90 t-shirts across S–XL, 30 handbags at 30cm×50cm) so manufacturers can begin their own calculations. I've written more on how minimums really work for small brands in my guide to what MOQs actually mean.
3. A list of fabrics and materials (your BOM)
BOM stands for Bill of Materials: a list of everything used to produce your garments.
A common misconception is that designers must know every fabric and composition they're going to use. It helps, but it's not a requirement — manufacturers just need a starting point. That could be as simple as "a thick cotton designed for winter wear". If you don't know the technical details, you can send a physical swatch to the supplier to source, or speak to fabric mills directly for samples.
If you do know your materials, fabrics and compositions, state them precisely — fibre content with percentages, and fabric weight in GSM where you know it.
BOMs also extend to zippers, buttons, trims, tassels, sequins and any other functional material. Because there are many types of zipper (you'd be surprised), accompany your BOM with pictures wherever possible, with a description of what each item is and where it sits on the garment.
4. Your Pantone code
Step four fills in the colours. Pantone has long been the world's leading authority on colour matching, so colours in a tech pack should be given as Pantone codes.
To find yours, go to pantone.com/color-finder, adjust the palette or search the name of your colour, and note the corresponding code for your pack.
If you found a colour through a search engine, screenshot the image, include it in your tech pack, and write the name you searched alongside it (e.g. ruby red) to help the factory pinpoint the shade.
The same rules apply to embroidery: if artwork is placed on the garment, specify its exact position and dimensions.
5. Your measurement spec (points of measure)
This is the make-or-break section — the difference between a garment that fits and one that doesn't — and it's the part most first tech packs get wrong.
Seam-to-seam measurements live in a spec table that the factory's pattern cutter and QC team will reference constantly. Each measurement is a numbered point of measure (POM), and each number appears as a callout on your flat sketch, so there is never an argument about where a measurement is taken from.
A worked example for a men's overshirt, base size M:
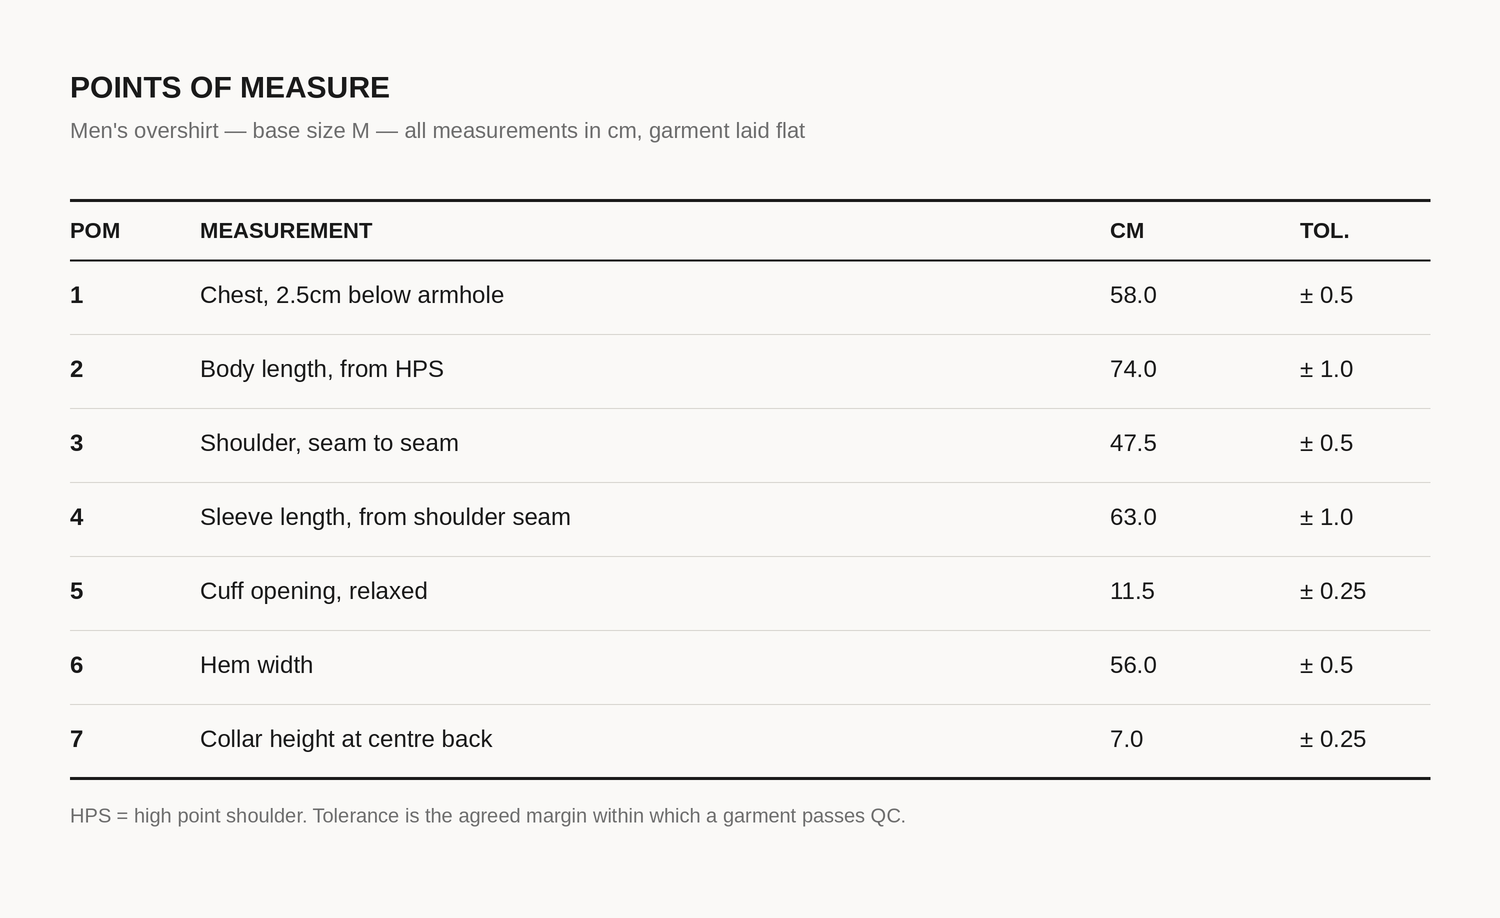
Three rules make a spec table work:
Say how each measurement is taken. "Chest" measured at the armhole and chest measured 2.5cm below it can differ by a couple of centimetres. HPS means high point shoulder — define it the first time you use it.
Include tolerances. A tolerance is the agreed margin within which a garment passes quality control. Without tolerances there is no shared definition of acceptable, and every dispute becomes a negotiation.
Measure a garment you like. Don't guess dimensions. Find something with the fit you want, lay it flat, measure every POM, and adjust from there. It's how the industry actually does it.
A note on grading. Grading is how your base size becomes a full size run — the increments each measurement grows or shrinks per size. It looks simple and isn't: bad grading is why a garment fits beautifully in M and looks wrong in XS and XXL. For a first collection, either keep the size run tight or have the grading done by someone who does it for a living. It's one of the best-value pieces of outsourcing in the whole process.
And a note on sampling. Measurements are tested in the sampling process, and things won't always work first time. If you're printing, a print strike-off — a 50cm × 50cm test print — checks quality before production. The sampling process will test your patience, but it's where your measurements prove themselves.
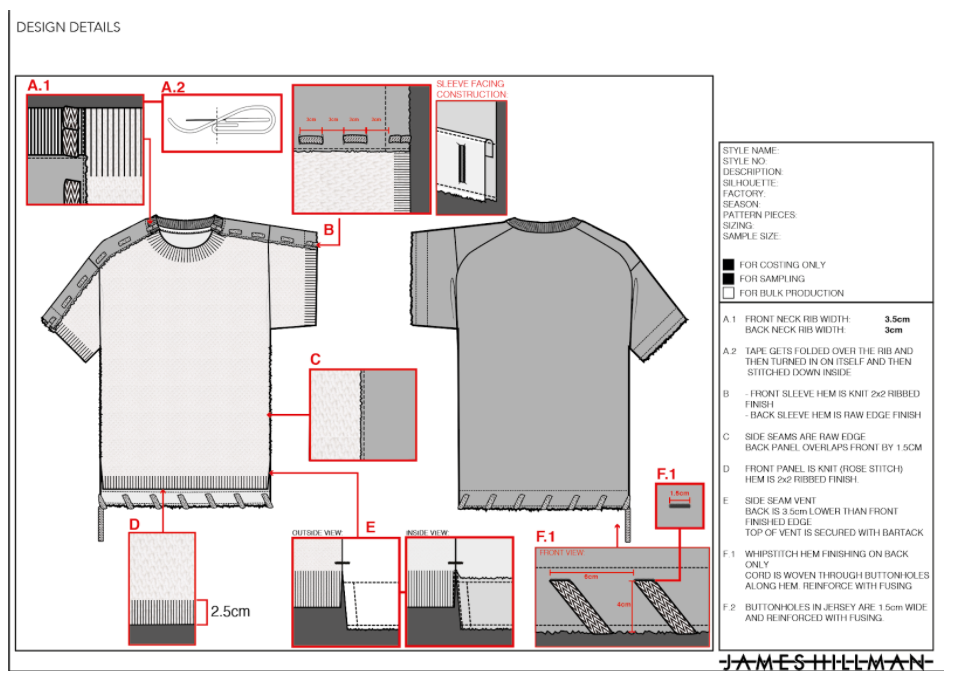
6. Construction notes
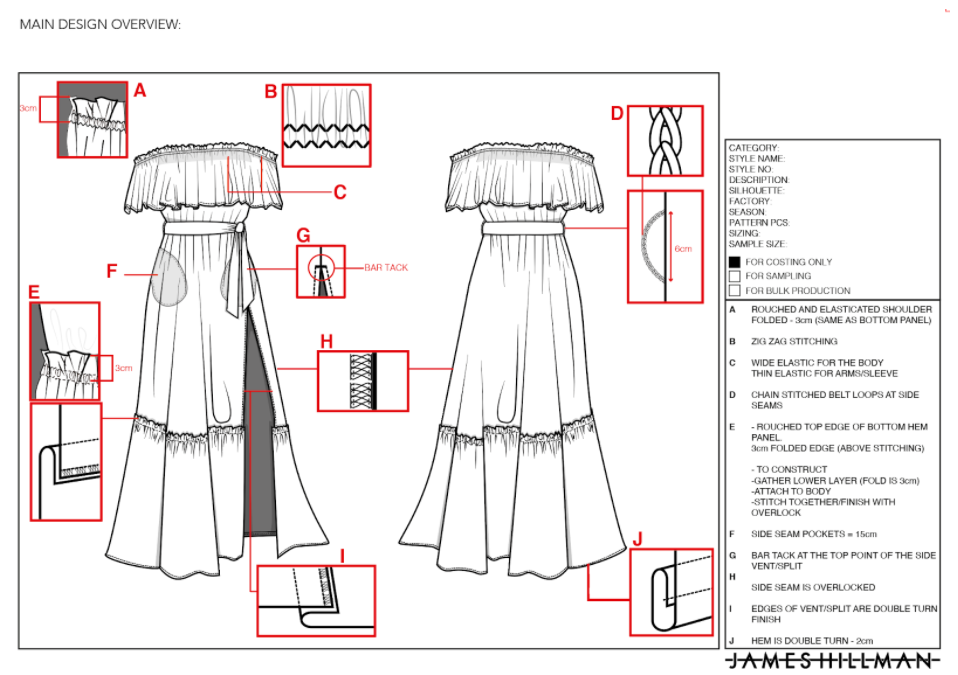
Construction notes tell the factory how to build the garment — and they're where the difference between a cheap garment and a considered one lives. The fabric can be identical; what you feel is the seams. If you don't specify, the factory uses its defaults.
At minimum, specify:
Seam types and allowances for the main seams — overlocked, flat-felled, bound
Topstitching — where it appears, the gauge, the thread
Bartacks at stress points and pocket corners
How the hems are finished
The easiest way to learn this language is to turn a garment you admire inside out and write down what you see. Photograph the details and put them in the pack — a picture of the exact cuff finish you want removes a paragraph of ambiguity.
7. Info about your brand identity
If your garments are going to be sold, it's time to add your branded labels and swing tags.
Include label and tag designs in the pack from the beginning — there are additional costs for these, and the factory needs to know where each one is placed. Swing tags vary in price by supplier, and details like eyelets and hanging materials carry unexpected costs of their own.
Make the specifications as detailed as possible: dimensions, positioning, fabric and colour, plus any imagery or embroidery, all annotated on a drawing.
Labelling is also a legal matter, not just a brand one. Fibre content, care instructions and country of origin have requirements in every market you sell into. Get them right in the pack and quality control becomes a check rather than a scramble.
8. Your final checklist
Nearly done. Use this checklist to make sure everything is present:
The pack is in a clear format a manufacturer can easily follow
An introduction page shows images or sketches of the desired garment
Your MOQs and size breakdowns are stated
Your fabric choices are described, with fibre content and weight where known
Colours are given as Pantone codes
Printing or embroidery is specified with placement and dimensions
The measurement spec table is complete, with tolerances, and every POM is numbered on the flat sketch
Construction notes cover seams, topstitching, bartacks and hems
Care labels, brand labels and swing tags are specified with placement
If every box is ticked, congratulations — you have a clothing tech pack that's ready to be sent to your manufacturer.
In summary
Tech packs may sound complex, but they're not. Break each stage down, make sure your garments have specifications, examples and annotations, and the process becomes easier. The more tech packs you create, the more comfortable you'll get. There are two ways to take this off your plate. If you'd rather do it yourself, my tech pack template has every section above ready to fill in — with a worked example to follow and a costing sheet that adds itself up. If you'd sooner hand it over, I build factory-ready tech packs for brands all the time. Tell me what you're working on and I'll take it from there.
Tech pack questions, answered
-
Cover page and flats, bill of materials, measurement spec with tolerances, colourways with Pantone references, construction notes, and label and packaging specifications. Complex garments add print or embroidery pages.
-
Typically eight to fifteen, depending on the garment. A t-shirt needs fewer; a lined jacket needs more. Completeness matters more than length.
-
-
Some offer the service, but a pack written by the factory measures the garment they want to make. The pack should represent you. Have it made independently, or make it yourself.
-
The spec sheet is the measurement table alone. The tech pack is the complete document the spec sheet sits inside.